Ingredients
1 eggplant, sliced width-wise into thin slices
1 bunch spinach
1 8oz container of mushrooms, sliced
1/2 red onion, chopped
2 cups mozzarella cheese
1/4 cup parmesan cheese
1 jar spaghetti sauce
Garlic/herb seasoning to taste
Oil for sauteing
Eggs (blended/mixed) approx for dipping
Breadcrumbs approx for coating
All purpose flour approx for coating
Basil/Parsley (optional)
Dicections
Preheat oven to 350 degrees
Dip each eggplant slice into blended egg mixture and then coat with breadcrumbs, garlic & herb seasoning, and all purpose flour (evenly). I mix the three together beforehand. In a pan, place some oil and begin to saute each eggplant slice until both sides are brown. After they are finished, use the same pan and saute chopped spinach, onions, and mushrooms.
Coat the bottom of your baking dish with a layer of sauce. Place eggplant slices to cover bottom. Place half the spinach, onions, and mushroom mixture on top. Add some more sauce, then cheese. Begin another layer with eggplant slices, mushroom, onions, and spinach mixture, sauce, and cheese. End with cheese on top, sprinkle with Parmesan and basil or parsley flakes.
Bake for 20 minutes or until cheese is bubbly/melted evenly.
Wednesday, October 23, 2013
Monday, August 5, 2013
German Chocolate Pecan Pie Bars
Yes. They are German Chocolatey goodness. AND pecan pie goodness. IN ONE!!
 Ingredients:
3 cups chopped pecans
1 3/4 cups all purpose flour
3/4 cup powdered sugar
1/4 unsweetened cocoa powder
3/4 cold butter, cubed
1 1/2 cups semisweet chocolate chips
3 eggs
3/4 cup packed brown sugar
3/4 cup light corn syrup (I used 3/4 cup honey instead and it worked perfectly)
1/4 cup butter, melted
1 cup sweetened flaked coconut (I thought it needed more, so next time I'll do 1 1/2 or 2 cups)
Heat oven to 350, and grease a 13x9 inch baking pan. In a large bowl, mix together the all purpose flour, powdered sugar and cocoa powder. Cut in the cold butter with a knife OR throw it all into a food processor for a minute. Press this mixture onto the bottom and up the sides of the greased pan. It'll look super floury and dry but when it cooks it'll come together. Bake the crust for 15 minutes. When done, immediately sprinkle the chocolate chips onto the crust.
In another bowl, combine eggs, brown sugar, honey (or corn syrup), and melted butter and whisk by hand until
smooth. Stir in pecans and coconut. Pour this mixture evenly over the prepared crust. Bake for about 30 minutes or until the edges are golden brown and the center has set. Let cool completely before digging in.
Wednesday, July 24, 2013
Ohn-No Khao Swe
 This is the Burmese version of Sadia's Khausay recipe. Ohn-No Khao Swe means something along the lines of coconut milk noodles and is a big deal is Burmese cuisine, so big in fact, it was adopted by and became a very popular dish in Thailand and even the Memons of India and Pakistan (hence Sadia's Khausay recipe). This, of course, is my adaptation of the recipe. (Because I can't just leave well enough alone. And because I always try to simplify recipes so that I don't have to use multiple steps or multiple pots and pans :-P)
Ingredients:
1 lb boneless chicken, cut into small chunks
1 onion, chopped
1 tbsp garlic and ginger paste
1 green chili, sliced lengthwise
2 tbsp gram flour/chickpea flour/besan, mixed with cold water to form a thick liquid
pinch of haldi/turmeric powder
1/2 tsp paprika
1/2 tsp red chili powder
1/2 tsp chili paste or crushed red pepper flakes
2-3 tbsp fish sauce
1 chicken bouillon cube
1 can coconut milk
Boiled spaghetti
chopped onion
fried onion
boiled eggs, chopped
chopped cilantro
minced green chili
lime wedges
crushed potato chips
Heat oil and saute the onion until they just begin to turn brown. Add ginger garlic paste, haldi, chili paste/flakes and chili powder and the green chili and saute for a minute. Add the chicken and saute until no longer pink. Add the gram flour slurry, fish sauce, paprika, and crushed chicken bouillon cube and stir. Add a half cup of water and reduce to simmering. After a minute or two, the sauce should thicken up. Add the coconut milk and salt to taste (or more fish sauce).
Pour the sauce over some pasta and garnish with the chopped onion, cilantro, fried onion, lime juice, green chili, boiled egg and potato chips.
Monday, July 15, 2013
jalapeno cream cheese rolls
These are so easy but were a big hit at an iftaar I hosted.
Ingredients:
8 oz. Package of cream cheese
1 can pillsbury crescent sheets (make sure you get crescent sheets not rolls)
1 can jalapenos or 1 jar pickeled jalapenos
The original recipe called for 2 ounces of jalapenos but I used at least 4. Chop the jalapenos into tiny chunks. Mix into the cream cheese. Unroll the crescent sheet, spread the cream cheese mixture on the crescent sheet. Roll it back up and slice into about 3/4 inch slices. Place on lightly greased baking sheet and bake at 375 for about 15 minutes or until golden Brown.
Wednesday, July 3, 2013
Stuffed Peppers
I made these with ground beef and quinoa for a slightly healthier meal. I fully cooked the quinoa and it came out slightly mushy once it baked with the meat and sauce mixture so I would recommend cooking the grains
 3/4 of the way initially.

green, yellow or red bell peppers (I like using the smaller ones)
1/2 lb of ground meat (beef, turkey or chicken)
1 cup of rice, brown rice, or quinoa
1 chopped onion
1 chopped tomato
1 tbsp tomato paste
3-4 minced garlic cloves
chicken broth or bouillon cube
seasonings such as salt, pepper, parsley, oregano, basil, paprika, cumin, etc You can pretty much throw in any seasonings you like and it works great.
you can also add various chopped veggies (mushrooms, zucchini, carrots, beans, peas, spinach, etc)
Marinara sauce or just some tomato paste mixed with water and seasonings.
Cook the rice, brown rice or quinoa with the chicken broth or bouillon cube dissolved in water, but use a little less liquid than you'd usually use so it comes out "al dente".
Saute onions in olive oil until they just start to turn golden brown. Add garlic. Add ground meat and cook until no longer pink. Add the tomatoes and the seasonings. Try to over season just a bit because the grains and peppers will take away from the seasoning a bit. When the meat is cooked and the tomatoes are broken down, add tomato paste and a little water until it thickens. Mix in the cooked grains.
Wash the peppers and slice off the tops trying not to cut off too much of the pepper. You can either fill the peppers this way, or slice them in half and fill them up as"boats". Remove the seeds from the center. lightly coat the outside with olive oil and sprinkle some salt and pepper. Fill the peppers generously with the grain/meat mixture and place on an oiled baking dish. Top with half of the tomato sauce/marinara sauce. Bake uncovered at 375 for about 20-30 minutes until the pepper is tender. Add more sauce upon serving.
Thursday, May 9, 2013
Burgers 101
EDIT: 5/14/13
I just added another tip on my bullet list below about washing the meat. Please take note!
**
I've been making on my own pizza with the dough from scratch for a long time. Years now. I like to think I've evolved a lot since I first began my pizza making adventures, thanks to google. Every few attempts, I'd search for a recipe even while I thought mine was perfect. Most of the time, it seemed my dough recipe was superior than the others and I'd decide not to change anything after skimming a new one. Instead I'd end up reading comments left by recipe testers and learn loads regarding techniques and make some changes here and there. Being open to trying new stuff really helped me master my skills and I can now say that I make some really awesome dough. But I'm not quite done with pizza yet. :) I've always used store bought pizza sauce and my next experiment will involve making my own sauce from scratch!
Enough about the pizza. This post is about burgers. I've been trying to make a good burger for a long time. On a pan. It's been tough. Usually I'd end up with a really dry, over cooked blob of meat. Often it'd be broken into pieces. And that's no fun. So in the quest to make just the right burger on my stove,I learned some amazing things. I'm going to list them all here. The most important thing IMO is the cooking technique which involves salting your pan. If you don't follow any of the other tips in the below list, I advise you to follow just that. I think it's that good!
- PURCHASING THE RIGHT MINCED MEAT: make sure you buy burger meat. This is not finely minced meat. It is thicker. It has a high percentage of fat. Personally, my husband and I don't usually eat beef at home. I always buy chicken and cook it through the week. We eat beef mainly when we go out as a treat, so every once in a while, I'm totally okay buying burger meat that has a high percentage of fat.
- COOKING IT FRESH: for a good burger, you want to get things going right away. This means no freezing meat, thawing and then marinating then cooking. Ideally you should plan ahead for this and right when you come home from the grocery store, get ready to cook it up.
- WASHING THE MEAT: a lot of (desi) people have mixed feelings about this. ideally you really shouldnt be washing minced meat at all. it gets rid of crucial components that are key to a good burger. contrary to popular belief, the red juice you see coming out of meat before or duriing the cooking process (sometimes) is NOT blood. all the blood is drained during the slaughtering process, esp if you eat zabiha. you can read more about it here: http://www.todayifoundout.com/index.php/2010/04/the-red-juice-in-raw-red-meat-is-not-blood/
- MARINADE INGREDIENTS: try not to use too many spices. a good burger tastes like pure beef. You will be adding veggies, sauces and cheese plus a bun to the mix, and that's enough. do NOT use salt in your marinade (we'll come back to this). go for a little steak or burger seasoning, pepper (if not already included in the seasoning mix), minced garlic and a little bit of crushed pepper if you like some heat. avoid any runny/watery additions to the mix such as onions etc. some people will squeeze the water out and add it anyway but i dont like adding anything watery. use onion powder instead if you want. I also add one egg to a pound and a half of meat.
- MIXING THE MARINADE: the biggest mistake most people make is that they overwork the burger meat. you should mix all your seasonings in one bowl, then add it to the burger meat and lightly mix it a few times. do not keep stirring with a spoon or do the kneading action with your hands. its not good for the meat at all. use the tips of your fingers to move the meat around so the spices get incorporated.
- SHAPING BURGERS: you can use a cheap burger press or your hands to shape eat pattie. try to keep them smaller in the center and thicker towards the sides. never press down on them hard. just lightly pat till the meat is the shape youre going for. wrap in plastic wrap or wax paper and refrigerate patties for a 2-3 hrs before cooking. if youre running short on time, you can pop them in the freezer for 15-20 mins.
- COOKING THE BURGERS- the most important step in the process is cooking! I use a non stick pan which i warm on low to medium heat. once that's done, i take my salt grinder then move it around over the pan, covering most of the pan surface with freshly ground salt. you can also use regular granulated salt. once this is done, lay no more than 3 burgers down in the pan over the salt, preferably close to each other. the salt does a few things here. it acts as a barrier between the pan and meat, so there's no sticky mess. it also ensures the burger cooks faster and stays juicy. it's basically magic. while one side is cooking, sit tight for 3-4 minutes. do not turn it. do not press down on it with your spoon. pay close attention to the 'sides' of the burger. when it looks like half of the burger from the bottom up is cooked and no longer pink, you're ready to flip. however, you still need to salt the surface for the other side. so try to get more in there before you turn over and place the other side down. once thats done, you need about 3-4 minutes on that side and youre ready to start building your burger. if i want cheese on my burger i usually add it at about this point so that it can melt off on top of the patty. if you are a freak about making sure your meat isnt pink inside, you can take a fork and poke at the meat to figure out if its done. most likely it is. it will be super juicy though and you might feel its not done, but it probably is. the patty stays hot for a while after being removed from the pan, and it sort of 'continues cooking' in its own heat for a good amount of time, so you should factor that cooking time in as well.
- BURGER TOPPINGS: for a yummy burger you may want to keep the following (or any variation thereof handy): cheddar/american/pepperjack cheese slices, mayo, mustard, ketchup, onions, tomatoes, lettuce. i usually also carmelize some onions in some oil/butter and add them. super yummy. in addition i saute mushrooms and jalapenos in some butter with italian seasonings and salt and offer those as a topping. you can also make your own mayo + ketchup sauce if you want but i usually feel its really strong and takes away from the taste of a traditional cheee burger. i dont wanna taste the sauce. i want to taste just the burger.
- BUILDING YOUR BURGER: i usually have my buns toasted in time for when i take the burger off the pan. i lay a sheet of foil out, over which i lay a sheet of wax paper (you can use just foil if you want). i put the buns over the wax paper, QUICKLY add my desired toppings and my burger patty while everythings still hot, then close up the burger in the wax/foil as soon as I can. i then let it sit in a lightly preheated oven for 5-7 minutes. i think this process helps all the flavors mesh together and gives the whole thing a really 'professional' taste.
- READY TO EAT! serve with fries and chow down!
Tuesday, April 30, 2013
Tabbouleh
I had to make Tabbouleh yesterday for an interfaith event where the menu was supposed to be Mediterranean. Sana had recommended buying the Near East box but I couldn't find it anywhere. So I used this recipe and everyone loved it! So, so happy!
Im just pasting the recipe I used.
Ingredients:
1 cup bulgur
3 tomatoes, seeded and chopped
2 cucumbers, peeled and chopped
3 green onions
3 cloves garlic
1 cup chopped fresh parsley
1/3 cup fresh mint leaves
2 teaspoons salt
1/2 cup lemon juice
2/3 cup olive oil
Im just pasting the recipe I used.
Ingredients:
1 cup bulgur
3 tomatoes, seeded and chopped
2 cucumbers, peeled and chopped
3 green onions
3 cloves garlic
1 cup chopped fresh parsley
1/3 cup fresh mint leaves
2 teaspoons salt
1/2 cup lemon juice
2/3 cup olive oil
Directions
SERVES EIGHT PEOPLE
NOTE:
I think the bulgur quantity listed is too much. I used maybe 1/3 of a cup? I didn't have green onions or mint, so I just added in 1/3 of an onion which gave it a nice kick. I also forgot to put in garlic :(
I also think that the parsley quantity should be 50% greater than listed, if not doubled. Many people told me they usually don't like tabbouleh because there is too much bulgur and they liked how mine was more green and colorful than whitish.
Enjoy!
Recipe taken from :
http://allrecipes.com/recipe/tabbouleh-iii/
Tuesday, February 26, 2013
Kimchi Fried Rice with Korean BBQ Beef
If anyone's not familiar with kimchi, it's a popular Korean condiment made of cabbage and chili paste, which is then fermented for anywhere from a few days to a year! I'm not actually a huge fan of kimchi...I think it's an acquired taste that I'm still in the process of acquiring. lol But it tastes great in this fried rice, I think because the flavors are more mild when cooked. I'm also not a fan of runny yoke, but I have to say the egg really is key for this dish.
.jpg) Ingredients for the BBQ beef:
Ingredients for the BBQ beef:
1 lb thinly sliced beef strips
a couple tbsp meat tenderizer
1 tsp ginger-garlic paste
4 tbsp soy sauce
4 tbsp brown sugar
1 tbsp honey
1 tsp sambal/chinese chili sauce
a dash of sesame oil
1/2 tsp sesame seeds
salt and pepper to taste
Mix together the meat and the marinade and let sit in fridge for at least a half hour. Heat a couple tbsp of oil in a wok over high heat. Throw in the meat and cook until the water evaporates and the beef is nicely seared. You can reserve the marinade and reduce it for a sauce.
For the rice:
2 cups cold cooked white rice
1 onion, chopped
1/2 to 1 cup kimchi (depending on how kimchi-ish you like it), chopped
~4 tbsp soy sauce
sliced green scallions
sunny-side up eggs
Heat some oil in a wok over high heat, throw in the onions and saute for a few minutes until tender. Add the kimchi and soy sauce and saute for another minute. Add the rice and stir well, frying for a couple minutes. Plate, and top with a sunny side up egg. Garnish with scallions.
.jpg) Ingredients for the BBQ beef:
Ingredients for the BBQ beef:1 lb thinly sliced beef strips
a couple tbsp meat tenderizer
1 tsp ginger-garlic paste
4 tbsp soy sauce
4 tbsp brown sugar
1 tbsp honey
1 tsp sambal/chinese chili sauce
a dash of sesame oil
1/2 tsp sesame seeds
salt and pepper to taste
Mix together the meat and the marinade and let sit in fridge for at least a half hour. Heat a couple tbsp of oil in a wok over high heat. Throw in the meat and cook until the water evaporates and the beef is nicely seared. You can reserve the marinade and reduce it for a sauce.
For the rice:
2 cups cold cooked white rice
1 onion, chopped
1/2 to 1 cup kimchi (depending on how kimchi-ish you like it), chopped
~4 tbsp soy sauce
sliced green scallions
sunny-side up eggs
Heat some oil in a wok over high heat, throw in the onions and saute for a few minutes until tender. Add the kimchi and soy sauce and saute for another minute. Add the rice and stir well, frying for a couple minutes. Plate, and top with a sunny side up egg. Garnish with scallions.
Tuesday, February 19, 2013
Roasted Leg of Lamb
This is one of my dad's specialties and I was fortunate enough to learn from him! It's surprisingly easy to make and makes for an impressive entree, but if you do plan on making this, know that it is time consuming...should be marinated at least overnight to 24 hours (I marinate mine for a few days when I can), and takes about 3 hours to bake.
Ingredients:
1 leg of lamb, thawed, trimmed of most fat (leave some on to melt into the meat during cooking)
1 box Shaan brand mutton roast masala
2 tbsp Shaan brand tikka boti masala OR fry chops masala (optional)
3 tbsp ginger-garlic paste
1 tbsp vinegar
1 tbsp lemon juice
1 tbsp olive oil
2 tbsp meat tenderizer
salt to taste
1/2 stick of butter, cut into 1/4 inch slices
1 bay leaf
3-4 black cardamom pods (bari elaichi/kaali elaichi)
3-4 whole garlic cloves
a few cloves and black peppercorns
With a knife, make deep slits/pockets in various places in the leg of lamb. Mix the mutton roast masala (and the tikka boti/fry chops masala if you're using it) ginger-garlic paste, vinegar, lemon juice, olive oil, meat tenderizer and salt to form a paste. Fill the pockets/slits with the masala paste and then generously rub it around the entire leg. Stuff the pockets with slices of butter. Cover with foil, let marinate in the fridge for as long as possible.
Preheat oven to 400 degrees. Use a large roasting pan with a rack or something that elevates the lamb so it doesn't touch the bottom. Spread oil over the rack and place the lamb on top. Pour about an inch of water into the bottom of the pan (make sure it doesn't touch the lamb at all) and place the bay leaves, cardamom pods, garlic, cloves and black pepper in the water. Cover TIGHTLY with foil and place in the oven for 2 1/2-3 hours. To test for doneness, gently and carefully peel back the foil and insert a fork into the lamb. When it's tender and the meat is pulling away from the bone it;s done! Reserve the juices from the bottom of the pan to use as an au jus/gravy. I serve this with spanish rice, kabuli pulao, cucumber yogurt sauce, salad, etc.
Tuesday, February 12, 2013
Creamed Spinach
This sounds weird. Tastes amazing. And is pretty bad for you. lol There are many different ways to make creamed spinach (milk, cream cheese, provolone, mozzarella, heavy cream...) but this is how I do it. I've also done it with kale and it turned out great, and I think the sauce would also be great for green bean casserole or cauliflower or even broccoli!
 Ingredients:
one bag/bunch spinach, rinsed and roughly chopped
2 tbsp olive oil
1 onion, diced
4-5 cloves of garlic, minced
4 tbsp butter
3 tbsp all purpose flour
1 cup half and half
parmesan or romano cheese
salt and pepper to taste
crushed red pepper flakes (optional)
heat the olive oil in a pan and saute the spinach for just a few minutes until it's wilted.
in another saucepan, melt the butter and saute the onions until tender. add the garlic and saute for another minute. add the flour and whisk until it forms a roux, and cook stirring for a minute. add the half and half and stir until incorporated. add the salt and pepper and cook for another few minutes, stirring. When its thick and bubbly add the spinach and cheese stir well. I served mine with steak and a bake potato...yummm.
Monday, February 11, 2013
Another Chicken 65 Recipe
 So this is Sunni's chicken 65, which I LOVE, with my tiny little variations.
Ingredients:
Chicken breast cut into cubes
1 tbsp ginger-garlic paste
2 tbsp soy sauce
2 tbsp chili-garlic sauce/sambal
1 tsp zeera/cumin powder
a splash or two or lemon juice and vinegar
pinch of cayenne pepper/lal mirch
salt and pepper to taste
pinch of red food color (optional)
5-6 curry leaves
1/2 tsp black mustard seeds/rye
1 jalapeno, sliced
Mix the first set of ingredients together and let marinate for at least a half hour to an hour. Heat oil over medium high heat. Mix about 3-4 tbsp of corn starch into the chicken mixture until the chicken is all coated. When the oil is hot enough, drop the chicken pieces into the oil (individually, or they will stick together!). Fry for about 7 minutes until the chicken is cooked. Drain.
In a separate pan, heat about a tbsp or two of oil, add the curry leaves, jalapeno slices, and mustard seeds and fry until the jalapeno looks a little soft and the mustard seeds start to "pop". Throw in the chicken and stir for about 30 seconds to a minute. Serve immediately.
Saturday, February 9, 2013
Grilled chicken 65 with imli chutney
Okay, so I'm not totally sure about the name of this recipe. This is just something I threw together one day when I couldn't figure out what to cook, and it turned out pretty good so here it is. This doesn't have any measurements so here goes:
First take about 1 lb of boneless chicken breast and cut it into cubes. Marinate it with minced garlic, chili garlic sauce, chicken tikka masala, tandoori chicken masala, lemon juice, and some red food coloring. Then take a grill pan and drizzle a little bit of oil on it (just enough to keep the chicken from sticking) and grill the chicken on it on medium-high heat. Once the water is dry and chicken is cooked through, add some sliced green chili peppers, curry leaves, and chat masala, and grill it for another few minutes. I fried up some French fries and served it with that.
For the chutney, soak some imli (tamarind) in water and pop it in the microwave for like 20 seconds. Remove the seeds and add some red chili powder, sugar, zeera powder, and a pinch of salt. Cook it until it thickens and chill it before serving.
Serve the whole thing with some parathas and you're good to go!

Friday, February 8, 2013
Moong Ki Daal - A Thick Yellow Lentil 'Soup' Prepared Pakistani Style
It's been four months since I moved away from home and I think I finally figured out how to cook something that comes very close to what my moms food tastes like. This is a big victory for me. Those who've had my indo-pak (desi) foods have great feedback, but it's almost never been good enough by my own standards. This time, things were different. Finally.

No matter how hard I try I can't seem to follow exact recipes for Indian or Pakistani dishes. I almost always guesstimate the spice quantity and that's how I like it. So if I don't specify the quantity for an ingredient below, you need to figure it out. Sorry!

Ingredients:
- 1 cup moong ki daal (yellow lentils)
- 1 tbsp minced garlic / garlic paste
- 1 tbsp minced ginger / ginger paste
- 3 tbsp tomato paste (comes in a can)
- 1/2 large tomato, chopped
- 1/2 a jalapeno pepper, chopped
- 1 tsp paprika
- 4-6 curry leaves
- 1 tbsp lemon juice
- water
- haldi
- red chilli powder
- salt
- cumin or zeera seeds
- cilantro
- a clove of garlic, finely sliced
- a small onion, finely sliced
- crushed red pepper / whole red chilli peppers
- olive oil
Method:
Soak the lentils overnight in 2 - 3 cups of water. This speeds up the cooking process. If you're unable to do so, just continue on with the recipe.
Combine lentils, ginger and garlic paste, olive oil, tomato paste, lemon juice, tomato, jalapeno pepper, paprika, curry leaves, haldi, salt, red chili powder in a pot. Add 3 cups of water. Bring to a boil on the stove, then add 1/2 cup water and simmer on low for an hour or until the lentils and tomato have all broken down and the ingredients have fused together. During this time you should check the pot every 10 mins or so and stir it to make sure there's enough water (add 1/4 cup at a time, as needed) and that the lentils aren't sticking to the bottom of the pan. After this process you can thicken the soup according to your liking by adding more water or cooking the water down.
In a separate pan, heat some oil. Add finely sliced onions and brown them. Add finely sliced garlic, cumin seeds, crushed red pepper, saute until everything is toasted and add the contents of the pan to the lentil soup pot while its still hot. Chop cilantro and mix in. Sprinkle with freshly squeezed lemon juice (2 tsp) and more fried onions if desired. Serve over basmati rice or drink it up with a spoon =)
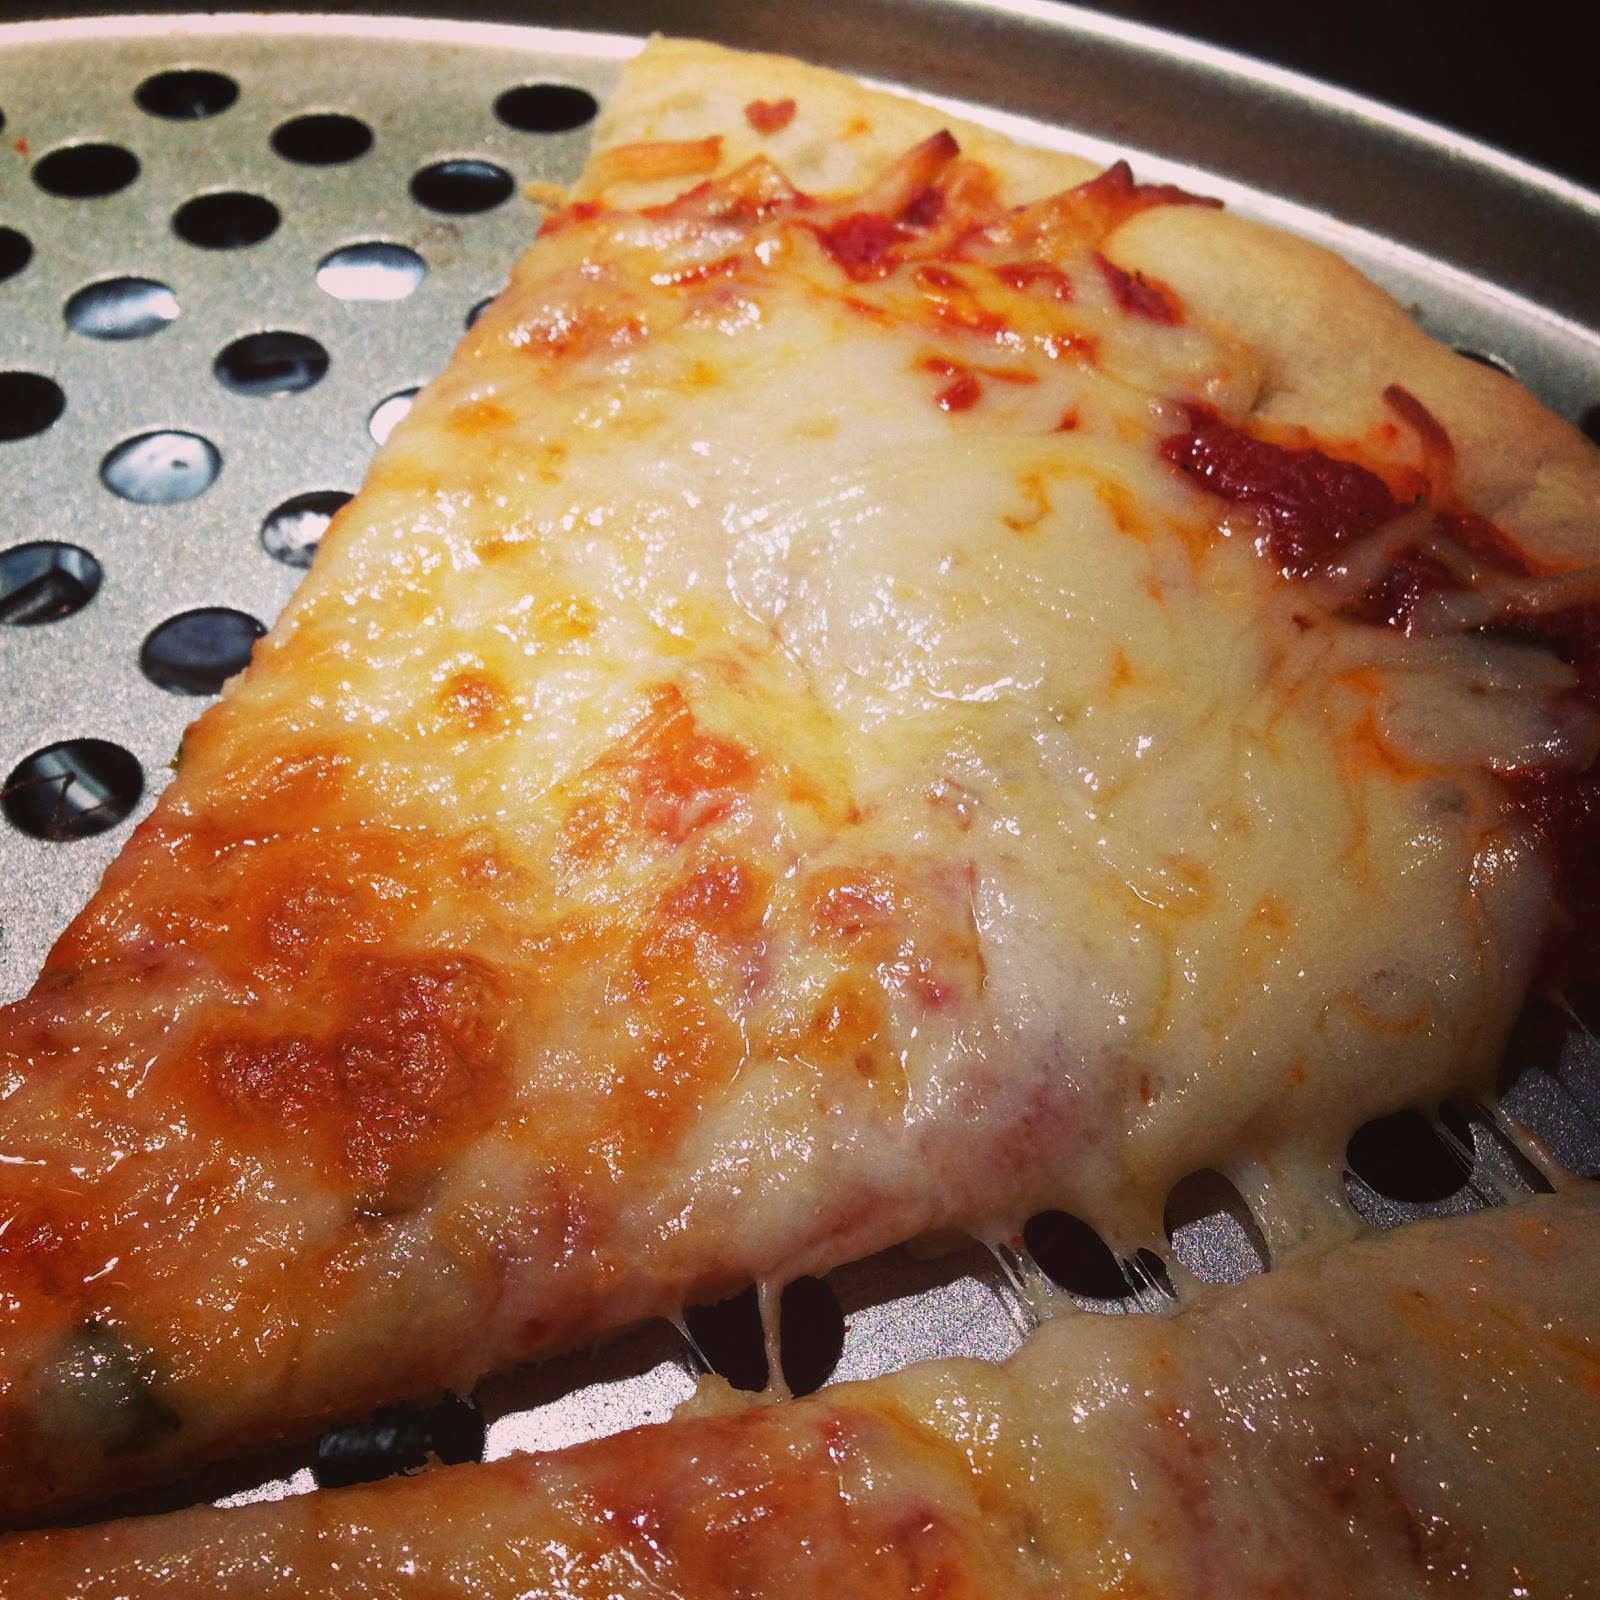
Pizza Revisited
A few years ago when this blog first began, I posted a pizza dough recipe. Since then, I've tweaked it. Here's the latest version:

Ingredients:


Ingredients:
- 3 cups bread flour - not to be confused with all purpose flour or self rising flour. bread flour is readily available in the baking aisle of any grocery store.
- 1 package active dry yeast - I use the rapid/quick rise yeast, not the slow rising one
- 1 tbsp brown sugar or honey
- 1 tsp salt
- 1/2 cup warm water - make sure it's not HOT, because that can kill the yeast
- 3/4 cup (or more) of olive oil (substituting vegetable oil will not really work out as well).

Method:
In a mug, mix honey/brown sugar and water. Add yeast and let it sit for 5 minutes.
In a separate bowl, sift together flour and salt.
If you plan to use a dough mixer (I use the Ninja Pulse System, it's great!) combine olive oil, water/honey/yeast mixture and pulse it. Add a cup of flour and blend with the dough paddle. Continue adding a cup at a time. Keep kneading in the machine for a few minutes afterwards. If the dough doesn't feel soft, add more olive oil and warm water (alternating) 1/4 cup at a time to get the right consistency.
If you plan to knead with your hands combine olive oil, water/honey/yeast mixture in a large bowl. Add half a cup of flour at a time and knead thoroughly. If the dough doesn't feel soft, add more olive oil and warm water (alternating) 1/4 cup at a time to get the right consistency.
Oil a large bowl and let the dough sit in it in a warm area for an hour. Cover lightly with kitchen cloth.
After an hour has passed, knead a bit more with your hands, and let the dough rise for an additional hour or two at which point it's ready to be rolled out and baked. i split the dough into two portions for thin to medium crust pizza. for a thick/pan crust i'd go for 2/3rds of the dough.
I use this pizza roller instead of a regular rolling pin and this perforated pizza pan (helps the bottom cook better/crispier). I cover the pan with a foil, lightly oil it, and use it as a mould to shape the dough with the roller.
I either half bake my crust (8 minutes) on 400 F (on the foil over the pan) before pulling it out of the oven, cooling it, adding toppings, then rebaking (without the foil over the pan) until the cheese is bubbly.
OR I half bake, add toppings, and freeze the whole thing for a day or more to bake it right before serving. I really liked the results of the freezing technique and will be sticking to that for the future. It also cuts 'day of' prep time by a LOT!
To avoid the veggie toppings from getting watery in the oven, saute your veggies in a pan on the stove before adding to the pizza.
For a flavored crust, I add 1 tbsp of minced garlic and 1 tsp of italian seasoning to the wet ingredients before the kneading process.
Monday, February 4, 2013
Special brownies
This isn't so much a recipe as an idea. But it's pretty amazing. Diabetes in every bite! ;-) lol
You'll need a batch of chocolate chip cookie dough, a pack of oreos and a batch of brownie batter. I use ghiradelli brand brownie mix and cookie mix.
Prepare the cookie dough and brownie batter as per directions. Pour the brownie batter into a 9x9 inch pan and bake until it's about 10 minutes away from being done. (Around 20-25 minutes). Take the brownie out of the oven and sprinkle a generous layer of large Oreo chunks. Top with a healthy layer of huge cookie dough globs to cover the top. Bake for another 10 minutes or so...I took it out when a toothpick came out just barely clean...this way the brownie and cookie topping are still slightly gooey. ;-)
Subscribe to:
Comments (Atom)